Space is tight at JamesGames.Com. In fact our testing room has so little wall space that we hid the TV behind a couch on a pop-up stand that sits in front of the room's main window. It has been a workable solution, effectively giving us an extra "wall" for the television. However, getting to the blinds on the window (which are now behind the couch and the TV stand was pretty difficult. I looked into motorized blinds, but they were expensive and required thousands of dollars in electrical work.
That's when Serena entered into my life. I found Serena on a website and it was another Internet success story, love at first site.
First, I saw the pictures of Serena, then gave Serena my measurements. Next thing I knew, I had Serena here.
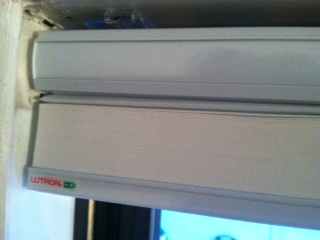
You see, Serena is a motorized, remote controlled, battery operated, custom window blind. Serena blinds are manufactured by Lutron, the company best known to do-it-yourselfers as the dimmer switch company.
Unlike the custom blinds I found in design shops in New York, these don't require power to be brought up to the window. The cost of that was prohibitive, and I was told by my electrician I didn't have any more free power in my apartment even if I wanted to chip into the walls in three rooms, pull new cable, and then replaster and repaint.
Serena blinds can work off of a socket, but they also have a battery option that claims to run for three years on standard D batteries. This meant that, so long as I measured correctly, I could probably install the blind without hiring anyone, effectively cutting the price of the blinds in half.
The manufacturer makes the process of measuring straight forward. You choose whether you want the blind inside the window frame or above it. They make measuring easy with videos that step you through the process. You measure the space in several directions. They adjust the size you enter to take into consideration the space you need to get the unit in place; in other words, you don't have to do any math with fractions to figure out how big the blind should be. You also choose the kind of material and construction of the blind. There are sheer, single cell and double cell blinds each of which has its own advantages depending on how much light you want to come into the room when the blinds are down. You also pick whether you want an infrared or radio-frequency remote control. The latter, which does not require line of site between the remote and the blind, was what I wanted so that I could put the switch in another room.
After putting down the credit card, you wait, but not too long. In about ten days a long box arrives at the front door. I examined the contents, being sure to keep the blind in its plastic wrapper so it wouldn't get dirty. The blind affixes to the window frame with four plastic clips. I have to admit I was skeptical about these clear plastic parts. I was afraid they would crack before I got the blind installed. Unlike the metal brackets that were on my old blinds, these seemed to have no give. As my window frame isn't completely square, front-to-back the brackets appeared to be going in odd directions like so many crooked teeth. With great apprehension my wife helped me lift the blind up to meet the brackets. And, we couldn't get it to work. In fact, we couldn't even figure out how to make the clip attach.
It was here I made my first mistake. I decided to clip one of the brackets on first to see how the mechanism worked. The good news was that I saw how the mechanism was designed. The bad news was it was a bear trying to get it off again so I could install it back on the window. Along the way I kept repeating a mantra to my by-now-disapproving wife: there is a thirty day return policy. If it doesn't work we'll just return it!
Getting the blind up and clipped in took about twenty minutes. Apparently, the brackets have enough flex built in that the blind was able to connect and hang straight. Phew! My spouse's disapproving look now morphed into a mixture of relief and even admiration. But, she was still doubtful of the whole project. How do you get the batteries into it, she asked. Turns out that is the easy part. Each bracket has a little push tab on the front. Press them in and the mechanism latches open exposing the space for the six D batteries.
We mounted the tiny remote on the wall near the light switch in the next room with a bit of supplied adhesive tape. I pressed the button and the shade lowered. Pressed it again and it raised. You can hear the motor, but it is not obtrusive. Watch the video here.
Overall we were very pleased with the result. In fact my wife is happier about the blind than I am. My quibble is that because of the way the plastic brackets work the blind is not held exactly flush with the window frame. There is just a bit of a gap that makes me wish that there was a valance of some sort to cover it up. I also think they should ship the unit with one or two more brackets just in case the installation doesn't go smoothly. On a purchase of over a thousand dollars, an extra part would have added only pennies.
So, my blind date with Serena worked out pretty well. If you need a powered blind in your home or office I highly recommend you give Serena a try!

Review: Serena Motorized Blinds
My blind date with Serena

By: James Oppenheim | Created: 2012-11-04 12:24:58 | (Updated: 0000-00-00 00:00:00)
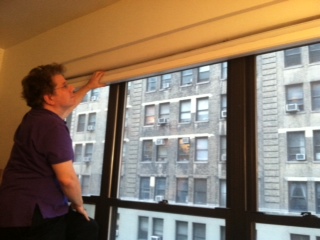
The Serena Motorized Blind being installed.

The plastic tabs, when depressed, cause the mechanism to open, revealing the battery compartment.